Mud abatement, Part 3
 Third in a series of posts about our efforts to reduce mud around our horse barn and in our pasture. In this post we reveal an inexpensive solution that seems to be working.
It’s late fall and the green grass is now brown. Soon rain will come frequently and the temperature will drop. Fall has been in the air and my thoughts are turning to winter mud. I’m amazed at how much less mud there is in the summer because the longer, warmer days are more effective at drying and there is a lot more vegetation. But most of this has died off and we’re starting to face inches of the gooey mess. But not so much in front of our barn anymore.
A little background:
Mikki wrote about our barn entrance mud a while back. To get a visual, you need only to view our 2010 Winter Mud video or the one about why we needed a 4×4 tractor. A few years ago we posted on some forums, asked around and although we mostly found pessimism that the problem could not be solved, we did get the following suggestions:
- Concrete or asphalt blacktop
- Sand
- Drain tile
- French drain
An idea that worked
The least expensive of those was sand. We had some success with it back in 7/07, but that was a limited test. This time we went bigger. Beach or river sand isn’t very common here but something called manufactured sand is. It’s created by crushing limestone and looks like gray dirt. So we paid $175 to a local dump truck driver to dump 2.5 tons of manufactured sand at the entrance of our barn. This was before our tractor so we spent a weekend spreading this stuff around with shovels and a rake. Boy were we tired the next day! But it worked. That was about a year ago and despite a lot of rain throughout the four seasons since, the area where we spread this manufactured sand doesn’t clog up with water and doesn’t stick to shoes and hooves like the clay beyond it.
Beyond the barn
This solution will only work for us in limited areas where there is high horse traffic. Now that the barn entrance area has less mud, we’ll next spread it on a path up the hill (to keep the tractor from making a muddy mess when driving up the hill) and around the round bale feeders.
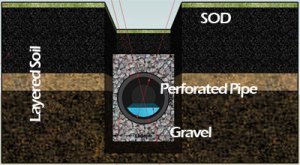
I’d like to try some of the other ideas above for the rest of the pasture, particularly the French drain or drain tile. An example of a French drain is below and a drain tile system is similar, but less fancy (no gravel – just bury a perforated pipe in a trench and cover with soil). I’m not sure how well they’ll work with clay. This stuff is so non-porous, I think we could make cups and bowls out of it.
The most obvious solution for the rest of the pasture is to plant grass. We’ve done this with a seed drill (more on this later) but since the entire pasture is open all of the time, the horses just walk all over it and eat the grass as soon as it sprouts up. What we need to do is create paddocks and practice rotation. A portion of the pasture at a time would be off limits for a year or more while the grass grows roots and thickens. We could feed round bales of hay for a year or longer if needed. Even on our small property, the fencing could get expensive, though. We’re considering using Electrobraid or similar electrified flexible fence that could be installed less expensively than wood.
We’ll let you know as we make more progress in our mud abatement effort. Please drop us a note if you’ve found something that works for you or if you have a question.
The entire mud abatement series:
Mud Abatement, Part 1
Mud Abatement, Part 2
Mud Abatement, Part 3 (this post)
November 30, 2018 update
I can’t believe it’s been 8 years since I wrote about this. A comment on the post reminded me that it’s time for a quick update.
The application of manufactured sand to the barn entrance from the pasture did the trick alright. 8 years later and it’s mostly still in place. We’ve lost a little to erosion (we still need to install a drainage pipe. A small stream runs near this area when it rains hard) but it’s not the muddy mess we had when we started. The horses congregate here because the water trough is located nearby.

2 thoughts on “Mud abatement, Part 3”
HI, I just saw you post. I was wondering, did you create a frame for the sand to stay in or did you just spread it out?
Thanks:)
Hi Melody, we just spread it out. I’m going to add an update in a few minutes but spoiler – after 8 more years, it has mostly stayed put and still works great.
-Bill